guide page
Actions
Communications and other action that need to be taken will be triggered by a document or forwarded email being received. Admin can edit entries and re-download if needed.
Member registration
Select an interviewer and send the whole committee the new registration form. This is a good time to make recommendations (if needed) about where the student might be placed and what they might need. It serves to help the interviewer and train everyone else.
Add the registration form and the interviewers name (with pending in notes) to the student progress-admin-view of the Zoho database. Also add any events they have completed in their past that fulfill PHCP requirements or are relevant and would help future mentors get a full picture.
note: You will not be able to search a new member in the student progress-admin-view until you add a training step for them. They will be in the dropdown for you to choose when you go to add a training step.
Training registration
Occasionally a supporting member decides to enter the training program. This form is found in step 1 of the Training page and allows them to fill in all their information without paying for a new membership. The form will look slightly different from the member registration but you will follow the same steps as above.
Interview Report
Search the students name in the student progress-admin-view. From the 3 dots on the left, edit the Interview step by adding a date, erasing pending, and upload the pdf. Also add any new events the interviewer may have discovered that fulfill a requirement. It can be helpful to add any notes about what the student may need to complete the program. This makes it easy to glance at a students file without opening the document.
As Chair of the Enrollment Committee new members will need to be recruited and trained from time to time. A template in gmail explains the job and is useful for recruiting. Keep committee members up to date on changes to the training program, upcoming events, etc.
IS Entrance Exam passed
Send the student the email template with the exam pdf attached and explain any answers they got wrong. The form can not be submitted until they have 3 or less incorrect. Add the pdf to ‘IS begins’ in the database. Ask admin to update their status.
In some cases this exam is used for professionals to check their knowledge and to have additional information in their file. If they are placed in IS or the advanced level you can enter it as an elective.
Scholarship expense report
Check that it is a PHCP approved event. This may depend on the students level and what they have completed so check their file. If you are unsure consult withe the scholarship committee chair. Send the pdf to the Treasurer for reimbursement.
Student non-PHCP event form
Add the student’s entry/s to the database if they are relevant.
Mentorship Evaluation
Add the pdf to the Zoho student progress-admin-view. First check that the correct mentorship has been selected and makes sense for the students skills and experience. Speak with the mentor if it doesn’t seem right. Admin can edit anything you need in the form. In notes write in 2 or 3 days for multi day mentorships and add any notes needed about what they need to advance, ready to post presentations, etc. Send a copy to the student in gmail templates.
When a student changes levels in the training program ask admin to update their status.
Beginning mentorship #3 – they must complete the IS entrance exam before their status is changed to ISP and they are listed in the practitioner directory.
Intermediate mentorship #3 with mentor approval to advance – check that they have beginning clinics completed (for those placed at that level), they have an IS exam, nutrition, a metabolic course, and at least 1 student progress report, before they may post their IS presentation.
Advanced mentorship #2 with mentor approval – check that all required subject and clinics for that particular student are completed before they may post their final presentation.
Placement mentorship
Sometimes mentors will want to discuss and get recommendations for where to place a student. If the mentorship is placed above the beginning level ask admin to change their status to the appropriate level and send them an email with the information about adding their profile to the practitioner directory. Add any notes to Zoho about courses they may need to complete before advancing to the next level.
With very experienced professionals that get placed in the advanced level or are even ready to post their final it can be useful for them to post an IS Presentation as practice and to get an idea of what the evaluators are looking for first. This can be optional and really depends on the student, how often they take photos and build case studies, and also how easily they can handle technology.
Traveling mentorships
Check the box for traveling mentorships in Zoho. If the evaluation has expenses attached, send it to the Treasurer for payment to the mentor.
Scholarship recipient
If the evaluation is for a scholarship recipient send the pdf to the Treasure for payment to the mentor.
More on scholarship recipients
Read through the scholarship agreement each recipient must sign. They are asked to save the pdf of this agreement and refer to it to see if events qualify for use of their scholarship fund.
Scholarship funds are awarded at the end of each March (2021 was in 5/15, 2022 was 4/1). Use the recipient spending/progress document in the recipient spending and progress folder to track hands on events for each active student. Individual breakdowns of events attended and remaining funds are also found in this folder. The Treasurer will update these funds and the summary document as spending takes place. Notify students ahead of time if they need more hands-on events to keep their scholarship funds active. Each recipient must complete 2 hands on events each year or their remaining funds will be forfeited. Checking this in January should give them time to schedule a mentorship if they need it. This document is a good place to keep notes about hands-on events completed.
At the end of March each year review the scholarship spending and progress summary – make updates to the notes about events completed – let the treasurer and admin know if a students scholarship funds are to be revoked for timing out or not completing the required hands on events – email students to let them know what they need to work on, how much time they have and how much is left in their funds.
Media Presentations
Media Presentation is ready for evaluation
The student will send an email letting us know their presentation is ready to be reviewed. Check over their presentation in SmugMug to see they have all the required photos. You can make suggestions like add more description to explain what you did and why but leave the evaluating to the committee members. Let them know you will notify the evaluation committee that it is ready for review.
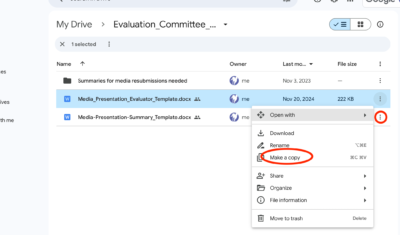
Go to the google drive – evaluation committee docs (there is a shortcut in the Dean folder) – make a copy of the media-presentation-evaluator-template – rename the copy (Joe_Blow_IS-media-presentation.docx) – open it and add their name and the date – get a link to share with the evaluation committee(be sure it is set to editor) – create a post on the evaluation forum and title it student name, type of presentation (IS or final), date – add a share link for the google evaluation doc to the post and a link to the student’s SmugMug presentation
See google tips for copying, creating, and sharing documents in google drive.
Media Presentation evaluation is completed
Subscribe to the evaluation forum to receive posts and answer questions they may have. The evaluation chair will also let you know when an evaluation is completed.
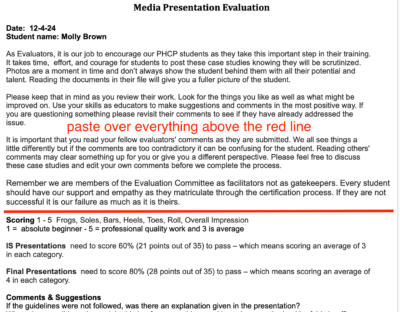
Go to the evaluation folder in google drive – open the media-presentation-summery-template and copy it – paste this over all the text above the scoring text – write in the students name and the date and either Pass or Redo – delete the evaluators names from the document – download the document as a pdf
The student passed
– add the pdf to the students file – ask admin to update their status to Advanced Student Practitioner or Practitioner – send the student an email (using templates) with the summary attached
The student needs a redo
– add the pdf to the ‘summaries for media resubmissions need’ folder in the evaluation committee folder – send the student an email with the summary and let them know of anything else the evaluation members are asking for, such as another mentorship (there is not a template created for this as these emails are very specific)
Track un-submitted presentations
When you are in SmugMug creating new folders for students this is a good time to check any empty folders and see how long they have been sitting there. Students must submit their presentation within one year of the mentorship they were approved to post it. Notify students coming up on that deadline and past the deadline. Remove any folders that have expired.
SmugMug Tips
As Dean you should login under ‘owner login’ with the admin login info stored in 1password. This will allow you to delete photos for students if they need that. Only admin can delete. Ask the student to label the photos the want deleted as delete.
Creating folders and galleries
Folders can be added to folders and galleries can be added to folders. There are the main folders like Step#6 Final Media Presentation and each posting student should have a folder under the corresponding step for their media presentation.
Go to the organize window – select the folder you want from the left side of the page (step#4 or step#6) – click on create and choose folder
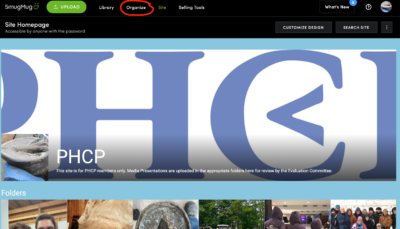
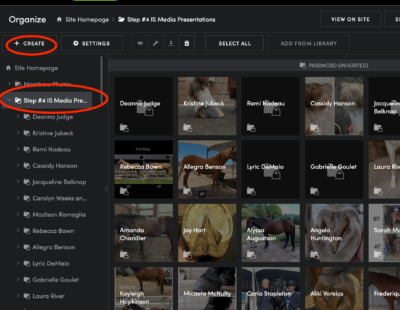
Title the folder with the students name and click create.
The folder you have created will be at the very bottom of the screen. Drag it up to the first position in the main folder you created it in (step#3 for example). Dragging folders, galleries, and photos is a bit of an art in SmugMug and the thing students have trouble with the most. Click and hold on the item you want to move and start moving it slowly. You will see a green box moving with you, try to drop it in the box when you get it to where you want. It can take a couple moves to get all the way there.
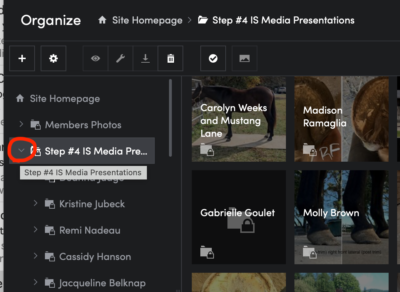
To create a gallery in the students folder click on the arrow next the the main folders title on the left to find their folder. Select their folder and choose create – gallery – title it Maintenance trim, Maintenance trim#2, or Pathology- click create. For final presentations you will have 2 galleries, maintenance trim and pathology.
For details on uploading photos, organizing and editing galleries visit the SmugMug Upload and Edit Instructions (this is located in the document section of the training page for students.
Google Tips
Making a document copy
Getting a share link
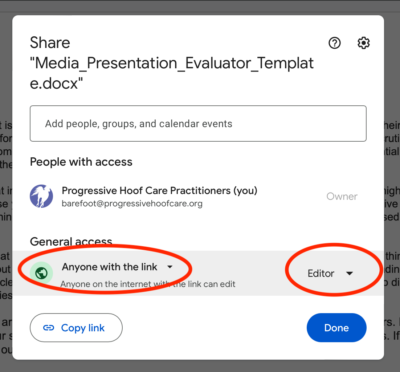
Go to share for the google doc. For documents being shared publicly they look best shared as a pdf. For the evaluation committee document you will need to share it in it’s editable form.
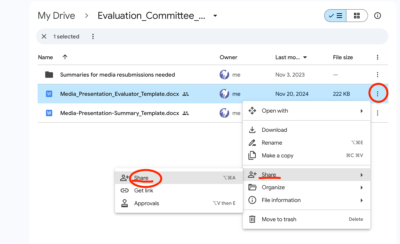
It’s best to make general access ‘Anyone with the link” so they don’t need to login to a google account to view it. Be sure to choose Editor instead of Viewer from the dropdown so the evaluators can add their comments.
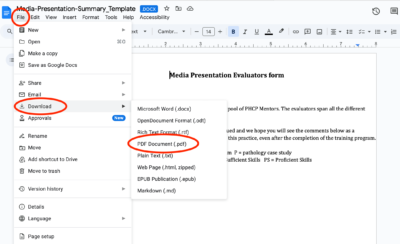
Download a pdf
To download a document like the evaluation summary as a pdf – go to file – download – PDF document
Updating a shared document
You can update a shared document and keep the same share link so it is automatically updated in all locations. After making your change in google docs save it as a pdf with the same file name. When you upload the new pdf to the same folder it will ask you if you want to replace the existing one. If you don’t get this option the file name is not exactly the same. Try copying and pasting from the old pdf to make sure they match.
Adding topics to this guide
After creating the topic here on this page, put your cursor in front of the topic title, then click on the named anchor icon (the little bookmark, next to last icon above right, just before user avatar icon). Enter the topic name as simply as possible – ideally, one word – if more than one, separate them by dashes (no spaces, lowercase only, ex. “new-topic”). Next, scroll below to the guide anchor links box and add the new anchor link there with exactly the same text. Hover over the new link and then drag it to put it into alphabetic order. The new topic will now appear in the sidebar index once you update this page.
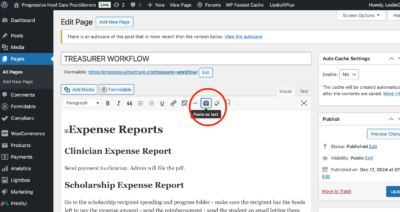
Never copy and paste into the website from another source without first selecting Paste as text from the tool bar.
